A Student List is a static list of students by student ID. You can use Student Lists in a variety of ways, from maintaining a list of students to track over time in intervention Effectiveness or offline, to send messages or appointment campaigns directly from the Student List.
One way that you can add students to a student list is by uploading an existing file that you have which contains only student ID’s.
Step 1. Save the file you would like to upload as a .csv (Comma Delimited). Once saved, navigate to your "Lists and Saved Items" page by selecting the bulleted list icon from the left-hand side tool bar.
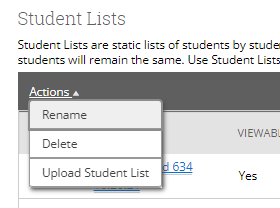
Step 2. Under "Student Lists" select "Actions" and then “Upload Student List".
Step 3. You will be prompted to choose the student list that you would like to upload to. You can either select an existing one, or choose to create a new one.
Step 4. Upload the .csv file containing a column of student ID’s. Make sure your file is saved as .csv, and then use the "Choose File" box to upload it.
Step 5. Select "Click to upload the file" and the students will begin uploading into the desired list.
Note: It can take up to 10 minutes before all the students in your file are added to the student list, especially for larger files.
There are a few ways to add students to a Student List within Navigate other than by uploading a student list. We will discuss them below.
Method 1
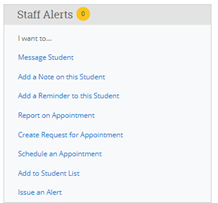
First, you can add a student to a Student List from the student’s profile page. Once on the student’s profile page, there is a list of quick links below “Staff Alerts” on the right-hand side of their profile. Here you will see “Add to Student List”. You will then be prompted to either add them to an existing list, or create a new one.
Method 2
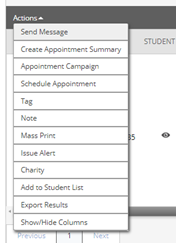
An alternate way to add a student to a Student List is through an Advanced Search. Once you complete an Advanced Search, you will see the "Actions" menu where you can select multiple, or all students from the search to add to a student list. Select students by selecting the small checkbox next to their name, or by selecting "All" directly below the actions menu. Once the student(s) you wish to add to the list are selected, hit "Actions" and "Add to Student List". You will then be prompted to either add them to an existing list, or create a new one.
If you would like to export student information that you have in a Student List, first navigate to the Student List you are interested in by selecting the name of the Student List.
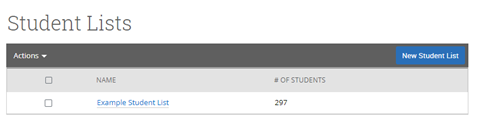
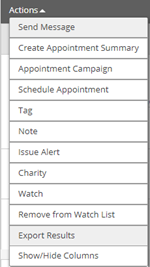
Next, select all the students in the Student List by click the box next to "ALL" and then click the arrow next to "Actions" to open the Actions drop-down menu.

Now, select "Export Results" from the drop-down menu.
From here, the Export Results Columns menu will appear. This is where you can choose what information you wish to be included in the exported document. If you, for example, don’t need to see the student’s home phone or address in this report, simply uncheck the box next to that item. Once you have the correct criteria selected, click "Export".

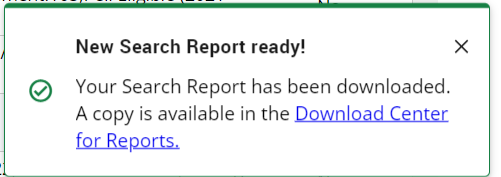
Once the report has been created, you will see a pop-up at the bottom of your screen that says, "New Exported Search ready!". The document should download automatically once ready. If not, select the "Download Center for Reports" link to access the page where the document can be downloaded.
In the Download Center for Reports, select the most recent search to download a copy of the excel document onto your computer.