Availability allows staff to indicate the days, times, locations, and services for which they are available to meet with students. Staff can choose whether the availability active duration is for a specific term or a specific set of dates. Staff can set availability for appointment scheduling, drop-in visits (for offices utilizing a kiosk), and/or appointment campaign purposes.
It is important to sync your professional calendar to the Navigate platform so that appointments can flow between your Navigate and professional calendars, blocking off that time and preventing double booking.
To sync your professional calendar to the Navigate platform, select the calendar icon from the left-hand navigation bar.

If you have not yet set up sync, you will see the image below.
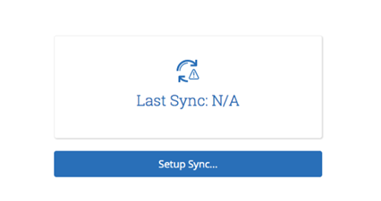
Select "Setup Sync". The calendar settings setup page will open. From here select Outlook Service Accounts and the sync will automatically begin. Allow Navigate up to ten minutes to complete the full sync of your calendar.
Note: Items that sync from your professional calendar to the Navigate calendar will appear as "Busy" on the Navigate calendar.
Note: You only need to sync your calendar once. After the first time you set it up, it will continue to sync automatically.
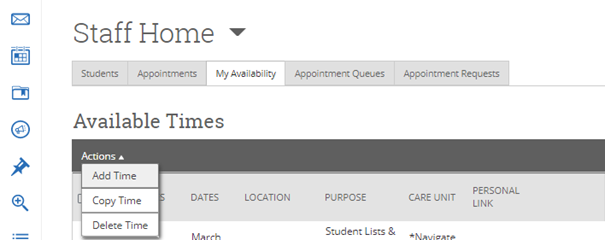
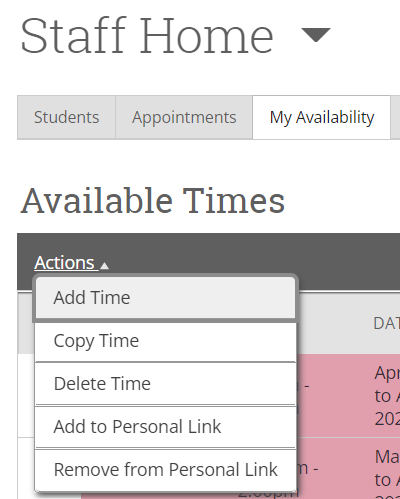
On the Staff Homepage, select the "My Availability" tab and then "Add Time" from the Actions drop down menu.
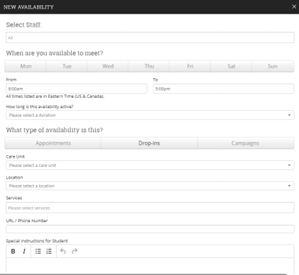
The Add Availability window will appear, and you can enter your availability details. The options are described below.
-
How long is this availability active?
-
Current Term: Availability will be active for the duration of the current term.
-
A Range of Dates: Pick a specific range of dates to offer the availability.
-
Forever: Availability will always be active
-
-
Add to your personal availability link?
-
Check this box if you would like to add this availability to your personal meeting link that you can provide to students.
-
-
What type of availability is this?
-
Appointments: Select this option when you want students to be able to make appointments with you during this time.
-
Note: Appointment availability has pre-set appointment lengths determined by administrators. So, if you put in appointment availability between 9am and 12pm, that time slot will automatically be divided into predetermined 15, 20, 30, or 60-minute slots for students to choose from depending on the service you are offering.
-
-
Drop-ins: Select this option if students will be dropping in.
-
Note: This only applies to departments/offices using kiosks or computers to sign students in for drop-in appointments using Kiosk Mode.
-
-
Campaigns: Select this option if you would like to use that availability in a campaign.
-
-
Meeting Type
-
In-Person
-
Virtual
-
Phone
-
Note: You CAN select multiple meeting types per one availability.
-
-
Care Unit, Location, Services
-
Select your desired care unit, location and service. Options will vary depending on which care unit you select.
-
-
URL/Phone Number
-
In this field enter your phone number, or WebEx/Zoom/etc. personal meeting link.
-
-
Special Instructions for Student
-
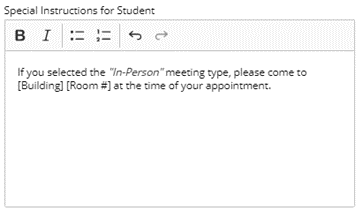
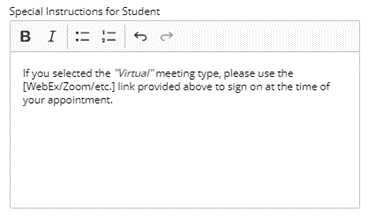
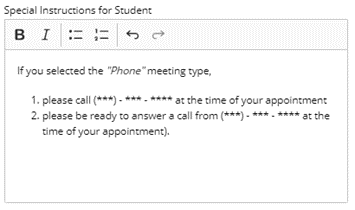
Special instructions are the most important step of the availability. The information you enter here will tell the students about how they will be attending the appointment. After scheduling the appointment, the student will receive a confirmation email that lists the “Additional Details” that you enter here. Without the special instructions, students will not know where to access/attend the appointment. See below for a Special Instructions template.
-
Below are three templates to use within your special instructions. Be sure to use one, two or all three of these depending on how many meeting types you add to your availability.
Option 1 – In-Person:
Option 2 – Virtual:
Option 3 – Phone:
Once you set your availability, as mentioned above, you have the option to include each of your availabilities within your Personal Availability Link, also known as your PAL. When you include an availability in your PAL, the link will be generated and displayed below your availability.
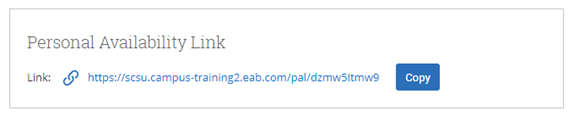
The PAL will bring students directly to your availability, and eliminate steps previously needed to pick what type of appointment they are scheduling and what service they are looking for. Instead, they will be brought straight to the times that you are available for the service that you chose to offer, significantly reducing the number of steps a student needs to make to schedule with you.
On the Staff Homepage, select the "My Availability" tab. To delete or copy an existing availability, simply click the check box next to the availability that you would like to choose and then use action menu to either edit, copy, or delete the desired availability.
-
Copy Time: Copying time can be useful when you want to add another day or time of availability and do not want to select the type of appointment, Care Unit, Location, and Services again. If you are going to be available for the same service in the same location but on a different day, you can use the copy time option to duplicate an existing availability and then change the times and days that were previously selected.
-
Edit: If you have selected something incorrect in the original availability, or your availability has changed to a different time or day, you can you the edit feature to change an existing availability to the new or updated version.
It is important to keep in mind that on days where you are sick, on vacation, or out of the office for any reason that students will still be able to make appointments with you during your regularly scheduled Navigate hours. To avoid a student booking an appointment with you when you are out of the office, be sure to have your Outlook calendar synced with Navigate (tutorial above). As long as you add the reason that you will be out of the office to your Outlook calendar with the times that you will be unavailable, Navigate will block those times off as “Busy” and prevent students from scheduling during those times.
For example, if your Navigate availability is set to 9am - 12pm Monday and Wednesday, but on Wednesday the 14th you have a doctors appointment, it's a holiday, etc. all you need to do is go to your Outlook calendar, add an event on the 14th during the times you are unavailable (or for the entire day) and make sure it is marked as "Busy". This will ensure students cannot book with you during those times.
If you are in an office where you need to enter student worker availability within Navigate, you will need to follow these steps to do so. Before following these steps, note that you need to have special access to enter availability for your student workers. If you cannot do the below, it is most likely because you do not have the proper permissions.
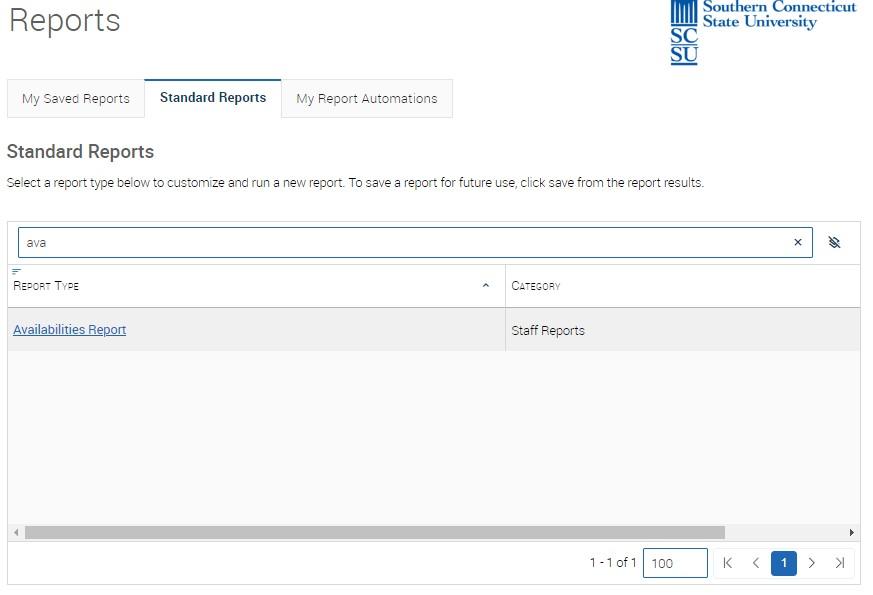
Step 1. Navigate to the Reporting page. The reporting icon is the one that looks like a spreadsheet with a magnifying glass on the left-side toolbar.
Step 2. Select the “Availabilities Report" under “Standard Reports”.
Step 3. Add the Care Unit that you are adding student worker availability to as the first "Field". In our example, we will use Orientation and Transition. Then, select "Run Report".
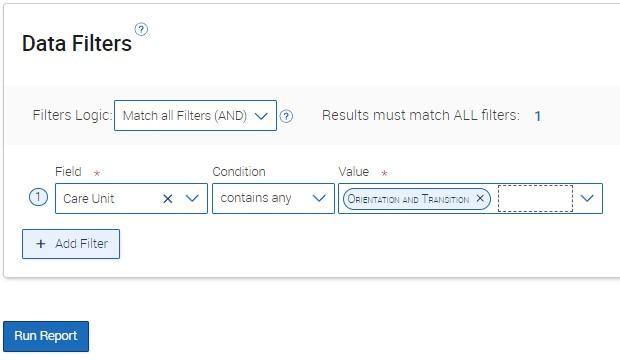
Step 4. Once you run the report, you will see a list of availabilities within the care unit.
If adding availability to an existing student worker, select the three lines next to their name and then "New Availability".
If adding availability to a new student worker, select the three lines next to any availability and then "Copy Availability".

Step 5. Now, you will see the following box appear. If adding to a new student worker, under the “Select Staff” you can type the last name of the student worker you are adding time for and then select their name from the list. Once the student worker is selected, you add the availability the same way you would for an ordinary availability. To see details on how to add times, see the "Creating Availability" section above. Make sure you select the appropriate care unit location and service for your student workers.
Note: If there are times and days that are different, you will have to create multiple availabilities.