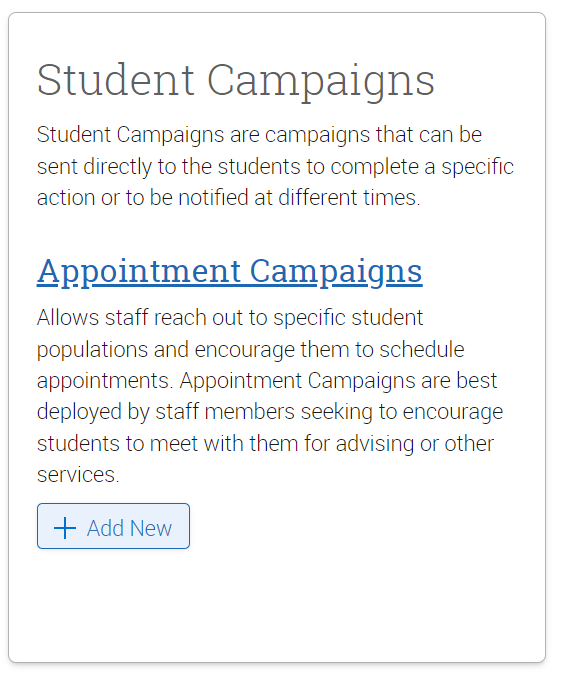
An Appointment Campaign is an important feature that allows staff members to reach out to specific populations of students to encourage them to schedule appointments by inviting them in and/or requiring they schedule an appointment(s). This functionality is commonly used when you have identified a population of students in need of additional support, and you are sending them a request to schedule an appointment with you.
Step 1. Define your Campaign Availability
To define your campaign availability, on the Staff Homepage, select the "My Availability" tab and then "Add Time" from the Action drop down menu. The following screen will appear.
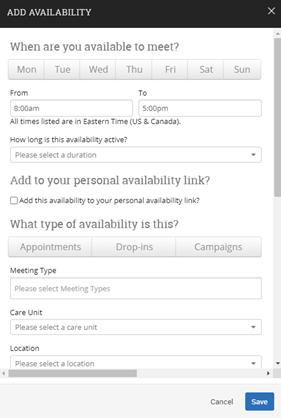
When are you available to meet? – Select one of the days and times you want students to be making availability with you for this campaign. You may have to define multiple availabilities for different days and times.
How long is this availability active? – Here you can either select the current semester, or a range of dates. If you have the same availability every Monday for example, you can just select the current semester, and the campaign dates will show the availability only on the range of dates that the campaign is running for. If you have different times on different days, you can select range of dates and make the range just the one day that you want that availability showing for.
Add to your personal availability link? – Leave this unchecked. Personal Availability Links are for appointment availability, not campaigns.
What type of availability is this? – Campaign.
Meeting Type – Select the meeting type(s) you would like to offer. You can select multiple meeting types. Students will be able to choose from the options depending on what you offer.
Care Unit – Select the Care Unit that you work within, if you are creating an Advising Campaign, you will select Academic Advising.
Location – Your location will be your department for Faculty Advising Campaigns.
Services – The services that appear as options in this step will depend upon what Care Unit you selected in the previous steps. Below is a table of available services for the Academic Advising Care Unit and what you should use each for.
-
Assigned Academic Advisor
-
This service can be used to discuss course registration/planning with your advisees.
-
-
Workshop/Event
-
This service can be used for group advising, information sessions, etc.
-
-
Faculty Office Hours (15-minute)
-
Faculty Office Hours (30-minute)
-
These two services can be used to invite students in your classes in for appointments or advise advisees.
-
Note: When defining your availability, make sure that all these fields are correct. When you move onto one of the next steps, you will need to define the campaign. You must have the exact same Care Unit, Location and Service for BOTH your availability and the Campaign in order for this availability to show up for the campaign. If even one of these aspects is different the availability will not appear.
Special Instructions – Be sure to add special instructions to each availability, one line for each Meeting Type you are offering. This will let students know where to go/what to do depending on the meeting type they chose. For example, for in person list the building & room number and for virtual give directions to access the appointment. If you chose both meeting types, include both instructions.
Step 2. Launching the Campaign
To create an appointment campaign, first select the “Campaigns” option from the left-side tool bar.
From here, under Student Campaigns, select "+ Add New". You can also view existing campaigns by selecting the blue "Appointment Campaigns" link.
Step 3. Defining the Campaign
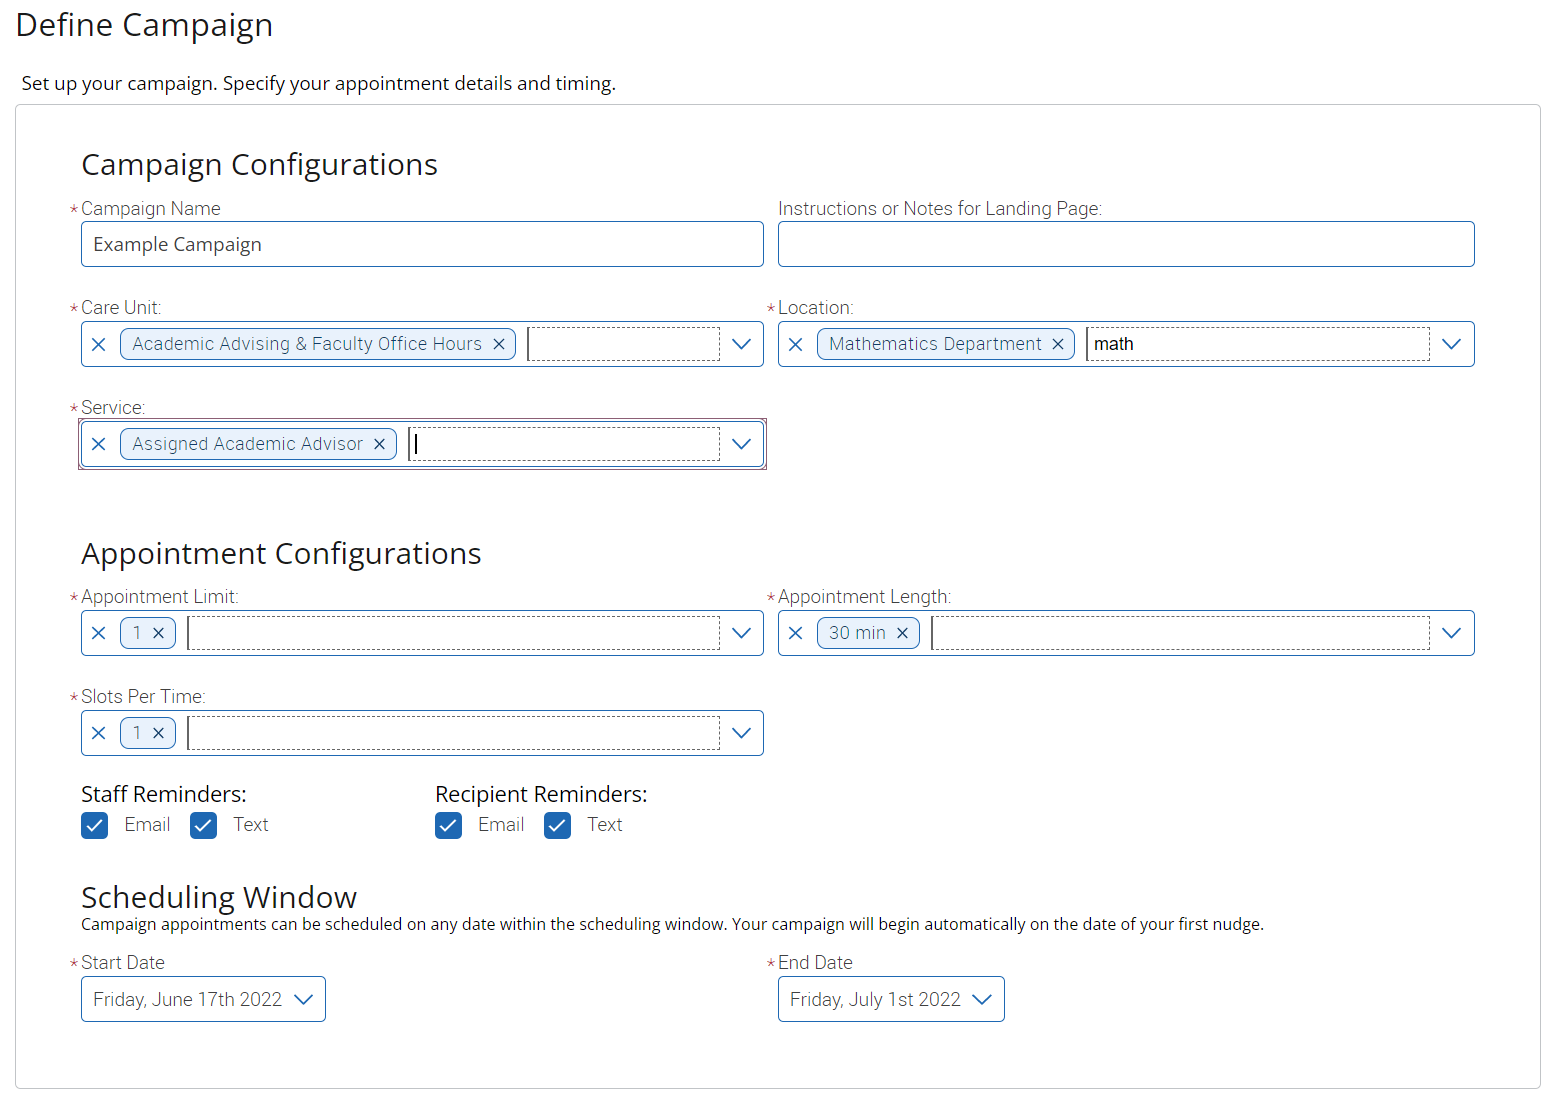
Next, you will have to define the campaign. Below are the categories in which you will have to establish the parameters of your appointment campaign. In this example, you will see a campaign designed for Advising Appointments.
-
Campaign Name is visible to the person creating the campaign, but not visible to the students. Always start campaign names with the most important info and make names as specific as possible (i.e. F16 Freshman Reg. Campaign).
-
Care Unit: Select the care unit the Appointment Campaign will be associated with.
-
Location: Select the location of where the appointment(s) will be held. For advising appointment campaigns, select your department (i.e. “Accounting Department”).
-
Service: Select the Student Service that will be associated with the campaign. This should be the same service that you selected for your availability in Step 1.
-
Begin and End Date: These are the dates that you want students to start and stop making appointments for the campaign.
-
Appointment Limit: This will determine how many appointments you wish for the student to schedule during the campaign.
-
Appointment Length: This is where you define exactly how long the appointment will be. Durations begin at a 5-minute length and can be up to 90 minutes.
-
Slots per Time: Appointments can be individual or group. By adding more than one "slot per time", you can have a group appointment.
Once you have defined your campaign, you can select the "Continue" option to move onto adding students to the campaign.
Note: You can also save the campaign and exit at any time during this process.
Step 4. Adding Students to the Campaign
When adding students to the campaign, if it’s an Advising Campaign, you will need to check the box that says "My Students Only" to the right of the search button. Check this, select search, and you will return a list of your assigned students (i.e. students assigned to you as their advisor in Banner). To include on currently enrolled advisees, you can add the enrollment term under the "Enrollment History" bucket.
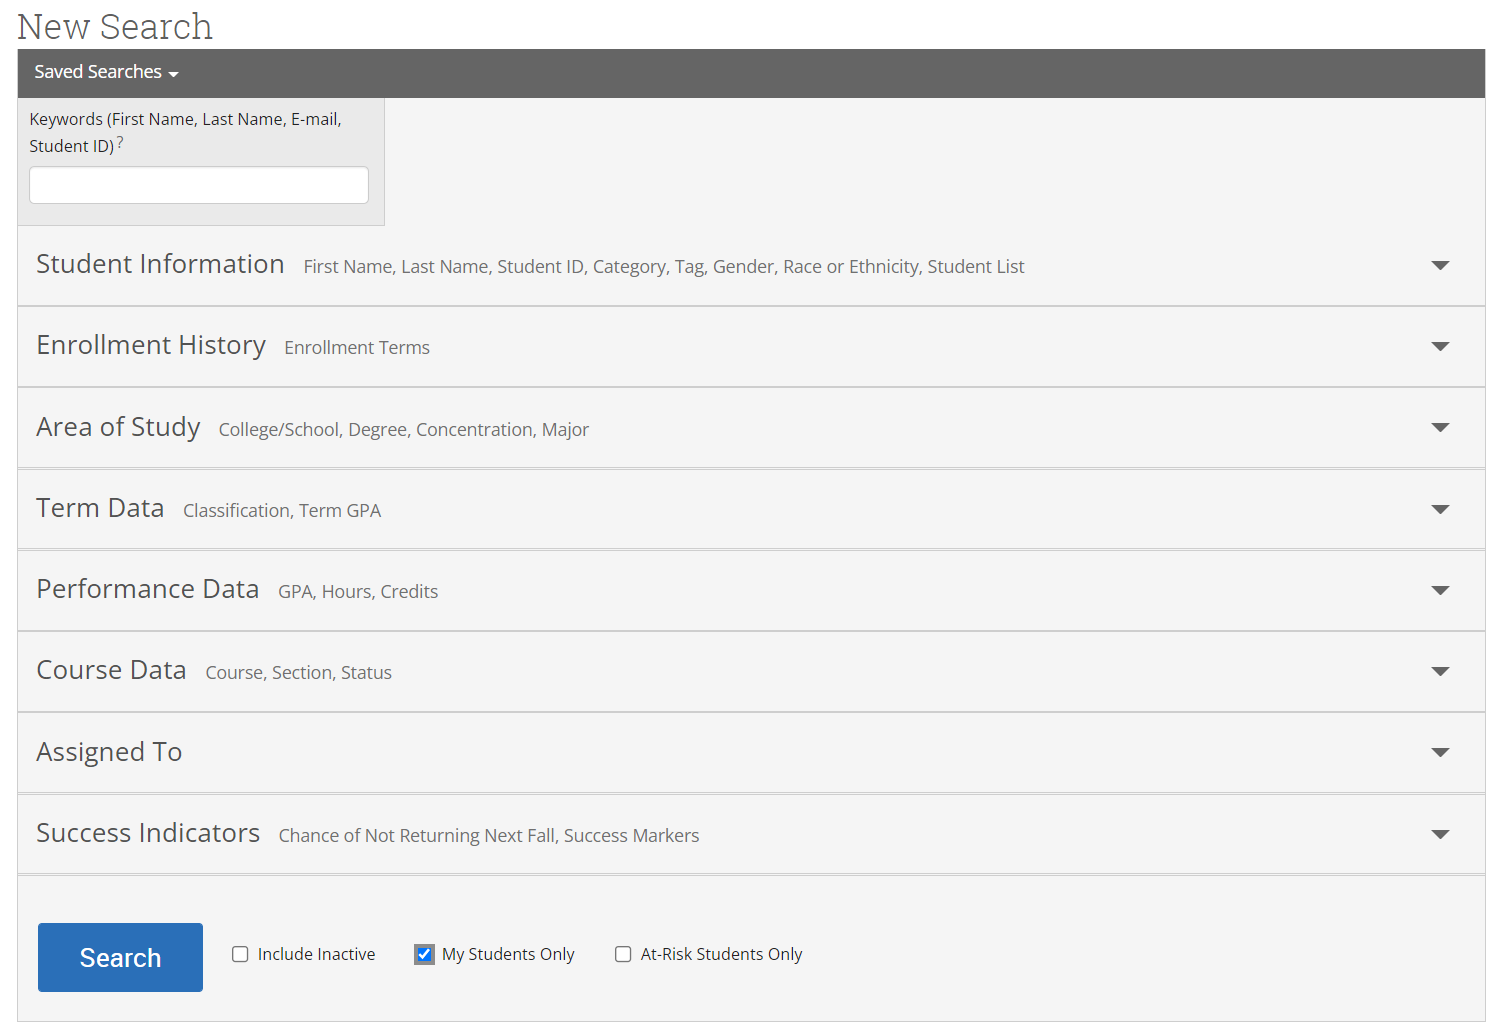
You can also add students to the campaign by using the advanced search function. You have the option of typing in parameters to search for students to invite to the campaign, or you can use a saved search. This is how to add students in your classes to the campaign. To use a saved search to add students to the campaign, simply open the drop-down menu below "Advanced Search" that says, "Saved Searches" and choose the search you wish to use from this menu and click "Search".
Now, all the students that return from your search will appear. You can then select all of the students from your search to add to the campaign by selecting the "ALL" check box. Alternatively, you have the option of selecting specific students from the search by checking the box next to their name. Once finished, click Continue to move to the next page. You will be asked to review the students in the campaign. If these are correct, click Continue.
Note: You can remove students from the campaign if needed. For example, if you met with one of the students already and don't need them to come in during the campaign period, they can be removed in the following “Review Students” step.
Step 5. Add Staff to the Campaign
Once you get to this step, all advisors that are available for the campaign you have set up will appear. You should always choose yourself in this step. If your name is not appearing, you most likely have not defined campaign availability, or there is an issue with your campaign availability (double check Step 1).
Note: If you want to use your appointment availability for your campaign, you must select ‘Include Appointment Availability’. Make sure that the Care Unit, Location and Service for your availability are all the same as your campaign, to ensure that your availability will appear in this step.
Step 6. Compose Nudges
Your final step is to compose nudges. This is where you will draft the initial email that students will be sent when you send the campaign and any nudges/reminders that you would like to be sent automatically on a certain day to students who have not yet scheduled their appointment.
Select “Add Nudge” to compose the initial email students will receive inviting them in for the appointment. Do NOT remove {$schedule_link} from the email body. This is what inserts the link that the students will use to schedule an appointment with you. Other than this, you can change anything in the email and select the send date as the start date for your campaign. Once you have completed your message, click Save Nudge.
Repeat these steps for any reminders you would like students to receive if they have not yet scheduled. You can choose the day in which you would like the reminder to be sent, and adjust the email to say something like “Second Notice”, “Third Notice”, etc.

Step 7. Send your Campaign!
The final page will show you a summary of your campaign. Review all of the information regarding your campaign and click Send when you are ready to complete the campaign set up.
Note: Once you send the campaign you cannot change the Care Unit, Location or Service defined in Step 3. So, make sure these are correct!
To access existing appointment campaigns, select the campaigns option from the left-side tool bar. Next, select the blue "Appointment Campaigns".
On the Appointment Campaigns page, you will see three at-a-glance statistics if the campaign is active: Appts Scheduled, Summaries Created, and Appts Attended.
Here are the definitions for these metrics:
-
Appts Scheduled: The % of appointments scheduled by students on the outreach list
-
Summaries Created: Of the appointments scheduled, % of summary reports filed for those appointments
-
Appts Attended: Of the appointments scheduled and summary reports filed, % of students were marked as having attended the appointment
To manage an appointment campaign, just select the name of the appointment campaign that you are interested in.
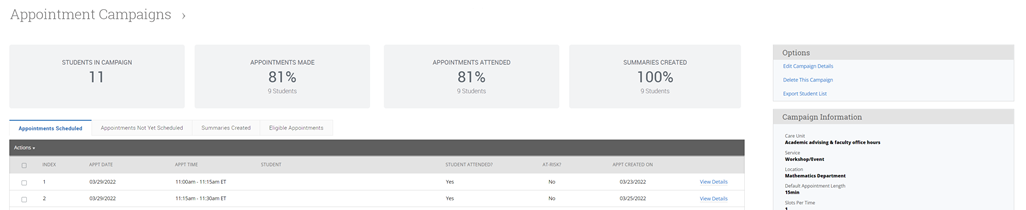
This page allows you to edit or delete the campaign. It also gives you crucial information about the campaign, broken down into four tabs of information, described below.
Appointments Scheduled: This tab lets you see which students have made appointments.
Appointments Not Yet Scheduled: This tab will display those students who have not yet made their appointment(s).
The Actions menu on either of these tabs allows you to Send a Message, Add Notes, Resend the Campaign Email, or Add Tags for the students.
Summaries Created: This tab will list any summary reports made from the campaign. From this tab you can view the detailed report or delete the report.
Eligible Appointments: This tab allows you to associate appointments that should be counted toward the campaign metrics but were scheduled outside of the campaign link. For example, a student could be included in a campaign even though they did not schedule the appointment by following the link in their email; instead, they called the location or just walked-in for the appointment. The Eligible Appointments tab allows a staff member to associate that student’s appointment with the campaign.
To associate an eligible appointment with the specific campaign you are currently viewing, click into the "Eligible Appointments" tab. Appointments will only display as eligible if they have the same care unit, location, service, and the student is in the appointment campaign. Select the appointment from the list shown. Then select "Associate Appointments" from the Actions drop down menu. Now that appointment will count as an appointment made in your campaign statistics.
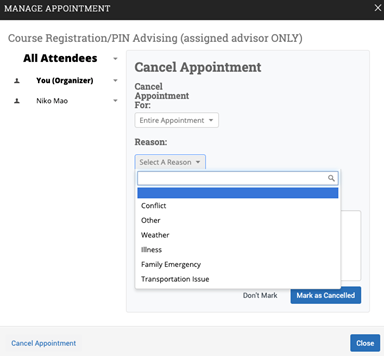
If you wish to cancel an appointment that has been already scheduled, below is how to do so.
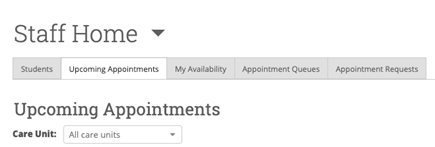
On your staff homepage, you will see a tab called "Upcoming Appointments". Select this.
Once you are on this page, find the appointment that you would like to cancel, and select "Details" located to the right of the appointment information. Select this, and the following pop-up will appear:
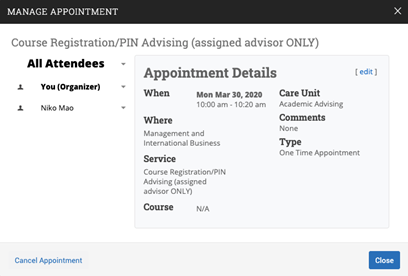
Select "Cancel Appointment". Then, select cancel "Entire Appointment" and a reason for the cancellation. Once you have filled everything out, select "Mark as Cancelled" and then you are done.